Oracle APEX enables you to optimize a page for printing: Optimizing a Page for Printing
In the Theme 25. Blue Responsive there exists a template PRINTER_FRIENDLY for printing an APEX page as HTML with the users’ web browser in a printer-friendly modus. In the universal Theme 42. Universal Theme this template is missing. An attempt to print for example a large classic report page with Firefox via the Browsers Print Menu printed only the first page followed by empty pages. The responsive design CSS rules seem to cause this problem.
The printer_friendly output of multi-page reports in the APEX Universal Theme can be reactivated with a custom page template, a menu entry, and by printing with a jQuery plugin. These are the steps to implement the printer-friendly modus in an application with a universal theme.
1. Install jQuery.print.js as an Application file
Download the file jQuery.print and then upload this file into your Shared Components / Static Application Files
After uploading the following file should be listed.
2. prepare the page template
Go to shared components Templates and filter the list with Theme = 42, Type = page. Then Copy the template named ‘Minimal (No Navigation)’ by clicking on the copy Icon of that row. Name the new template ‘Printer Friendly’. Click Copy the save it.
 <div class="t-Body">
  <div class="t-Body-main">
    <div class="t-Body-title" id="t_Body_title">
     #REGION_POSITION_01#
    </div>
    <div class="t-Body-content" id="t_Body_content">
     <div class="t-Body-contentInner" role="main">
     <button class="t-Button t-Button--noLabel t-Button--icon" onclick="history.back();" type="button" id="GO_BACK" title="Go Back" aria-label="Go Back">
      <span class="t-Icon fa fa-arrow-left" aria-hidden="true">
      </span>
     </button>
     <button class="t-Button t-Button--noLabel t-Button--icon" onclick="$.print(print_region);" type="button" id="PRINT_REPORT" title="Print Report" aria-label="Print Report">
      <span class="t-Icon fa fa-print" aria-hidden="true">
      </span>
     </button>
      #BODY#
     </div>
     <footer class="t-Footer" role="contentinfo">
      <div class="t-Footer-body">
       <div class="t-Footer-content">#REGION_POSITION_05#</div>
      </div>
     </footer>
    </div>
  </div>
 </div>
 <div class="t-Body-inlineDialogs">
  #REGION_POSITION_04#
 </div>
var print_region = ‘div.t-Body-contentInner’;
4. Edit the Theme Component defaults
In Shared Components click on Themes. In the Themes list click on the Name ‘Universal Theme – 42’. Now set the Printer Friendly Page to ‘Printer Friendly’ and Save.
5. Prepare the menu entry
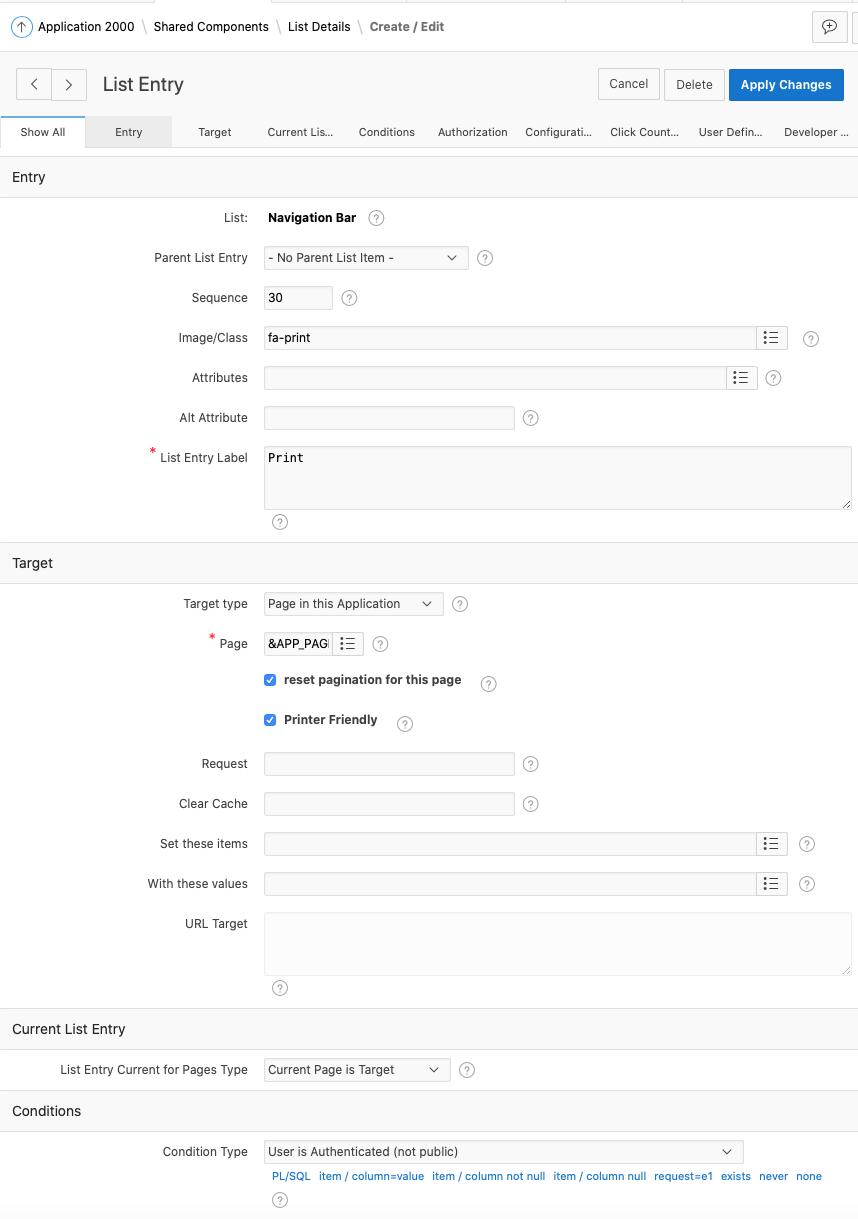
In Shared Components click on Navigation Bar List. In the Lists Report click on the Name ‘Navigation Bar’. Now click on ‘Create Entry’. Set the following items:
Image/Class: fa-print
List Entry Label: Print
Target type: Page in this Application
Page : &APP_PAGE_ID.
reset pagination for this page: enabled
Printer Friendly: enabled
Condition Type: User is Authenticated (not public) – to avoid display on the login page
After saving the Menu Entry the following line should be shown in the List Details:
When you run your application you will see a Print Icon in the upper-right of your web page.
When you click this button the printer-friendly page will be loaded. The page will open the browser’s printer dialog popup window. Here you can further optimize the output and redirect the output to a pdf file.
You can specify a print region for each page by overwriting the javascript variable print_region. For example, set the Static ID of a page region to TABLE_DATA_HEAD and then add the following line the the ‘Function and Global Variable declaration’:
var print_region = $(‘div#TABLE_DATA_VIEW’);
Here are links to the demo:


